JavaWeb(黑马)
声明:这些笔记是主包看《黑马程序员 JavaWeb》网课时随手记然后后期让 ai 优化的,重点肯定会有遗漏,记的也不一定全是重点。JavaWeb 部分还是很重要的
前端部分全跳过,MySQL 只简略看。
进度:9.7 Maven → 9.9 MyBatis → 9.14 完成 JavaWeb → 9.21 苍穹外卖结束。
目录
- 一、Spring:IOC 与 DI
- 二、MyBatis
- 三、RESTful 与请求参数
- 四、分页查询与传参
- 五、文件上传与阿里云 OSS
- 六、登录与会话
- 七、JWT 令牌
- 八、Filter 与 Interceptor
- 九、全局异常处理器
- 十、事务
- 十一、AOP
- 十二、SpringBoot 自动配置
一、Spring:IOC 与 DI
两个核心概念:
- IOC,控制反转:对象的创建权交给 Spring
- DI,依赖注入:容器把对象需要的依赖自动塞进去
Bean 对象就是交给 IOC 容器管理的对象。
解耦的做法很直白:把代码里手动 new 的对象都删掉,改成注入。
分层注解
@Service、@RestController、@Repository 的源码上都标了 @Component,功能完全一样,只是语义化,用来区分层级,方便读代码。
@Service→ 业务层@RestController→ 控制层@Repository→ dao 层
Controller
@RestController
public class EmpController {

    @Autowired // 运行时 IOC 容器找到该类型的 Bean,赋值给这个变量
    private EmpService empService;   // 原稿 privete 是笔误

    @RequestMapping("/listEmp")
    public Result list() {
        List<Emp> empList = empService.listEmp();
        return Result.success(empList);
    }
}
Service
@Component // 告诉 Spring 把当前类创建成 Bean,放进 IOC 容器管理
public class EmpServiceA implements EmpService {   // 原稿 Empservice 大小写不对
    @Autowired
    private EmpDao empDao;

    @Override
    public List<Emp> listEmp() {
        // 具体实现
        return empDao.list();
    }
}
接口示例:
public interface EmpService {
    List<Emp> listEmp();
}
同类型有多个 Bean 怎么选
假设 EmpServiceA 和 EmpServiceB 都加了 @Component,注入 EmpService 时会报「找到多个候选 Bean」。三种解决办法:
- 在其中一个类上加
@Primary,标记它优先 - 在注入处用
@Qualifier("empServiceA")配合@Autowired指定名字 - 用
@Resource(name = "empServiceB")按名字注入
@Autowired 是 Spring 自己的注解,默认按类型注入。@Resource 是 JSR-250 标准注解(javax.annotation.Resource,新版是 jakarta.annotation.Resource),默认按名字注入,不是 Spring 专有的——原稿写「jdk 提供」不准确,Java 11 之后 JDK 里已经没有它了。
二、MyBatis
MyBatis 封装了 JDBC 的底层操作。数据库连接池的标准接口是 DataSource,getConnection() 的实现由连接池提供。
Mapper 接口加注解
@Mapper
public interface UserMapper {

    @Select("select * from user")
    List<User> list();
}
list() 只是接口里定义的一个抽象方法,名字随便取(getAll()、findAll() 都行)。@Select 给这个方法绑定 SQL。调 userMapper.list() 时,MyBatis 执行 SQL、把每一行封装成 User 对象、装进 List 返回。
@Mapper
public interface EmpMapper {

    // 根据 ID 删除
    @Delete("delete from emp where id = #{id}")
    void delete(Integer id);
}
#{} 和预编译
#{} 会被编译成 JDBC 的 PreparedStatement 占位符 ?,参数是预编译传入的,能防 SQL 注入。
${} 是直接把值拼进 SQL 字符串,不要用它接收用户输入,会注入。
字段名和属性名不一致
数据库是 dept_id,Java 是 deptId,直接查会映射不上。两种办法:
// 办法一:起别名
@Select("select id, username, password, name, gender, image, job, entrydate, " +
        "dept_id deptId, create_time createTime, update_time updateTime " +
        "from emp where id = #{id}")
Emp getById(Integer id);
# 办法二:开启驼峰命名自动映射,更省事
mybatis:
configuration:
map-underscore-to-camel-case: true开了开关之后,dept_id 会自动映射到 deptId。
注解和 XML 二选一
复杂 SQL 用 XML,简单 SQL 用注解。同一个方法不能两边都配,会冲突。
动态 SQL
这部分原稿因为 Obsidian 会把 XML 标签当成 HTML 渲染,标签都没写全,所以统一放进代码块。
<if> 配合 <where>,<where> 会自动去掉开头多余的 and:
<select id="list" resultType="com.itheima.pojo.Emp">
    select * from emp
    <where>
        <if test="name != null and name != ''">
            and name like concat('%', #{name}, '%')
        </if>
        <if test="gender != null">
            and gender = #{gender}
        </if>
    </where>
</select>
<set> 用在 update,会自动去掉末尾多余的逗号:
<update id="update">
    update emp
    <set>
        <if test="username != null">username = #{username},</if>
        <if test="name != null">name = #{name},</if>
        <if test="updateTime != null">update_time = #{updateTime},</if>
    </set>
    where id = #{id}
</update>
<foreach> 用来遍历集合拼 in:
<delete id="deleteByIds">
    delete from emp where id in
    <foreach collection="ids" item="id" separator="," open="(" close=")">
        #{id}
    </foreach>
</delete>
对应的 Mapper 方法要加 @Param:
void deleteByIds(@Param("ids") List<Integer> ids);这里原稿写的是
List<Integer.> Ids(笔误),而且没加@Param。MyBatis 只有一个集合参数时,collection默认只能叫list或collection;XML 里写的是collection="ids",就必须用@Param("ids")把名字对上,否则启动或调用时报参数找不到。
<sql> 和 <include> 用来抽公共片段,提高复用性,用起来有点像方法调用:
<sql id="commonSelect">
    select id, username, password, name, gender, image, job, entrydate,
           dept_id, create_time, update_time from emp
</sql>

<select id="getById" resultType="com.itheima.pojo.Emp">
    <include refid="commonSelect"/>
    where id = #{id}
</select>
三、RESTful 与请求参数
Tomcat 负责解析 HTTP 请求。
package org.example.javawebdemo1.controller;

import lombok.extern.slf4j.Slf4j;
import org.example.javawebdemo1.pojo.Dept;
import org.example.javawebdemo1.pojo.Result;
import org.example.javawebdemo1.service.DeptService;
import org.springframework.beans.factory.annotation.Autowired;
import org.springframework.web.bind.annotation.*;

import java.util.List;

@Slf4j
@RestController
public class DeptController {

    @Autowired
    private DeptService deptService;

    @GetMapping("/depts")
    public Result list() {
        log.info("查询全部部门数据");
        List<Dept> deptList = deptService.list();
        return Result.success(deptList);
    }

    @DeleteMapping("/depts/{id}")
    public Result delete(@PathVariable Integer id) {
        log.info("删除 id 对应的部门数据");
        deptService.delete(id);
        return Result.success();
    }

    @PostMapping("/depts")
    public Result add(@RequestBody Dept dept) {
        log.info("新增部门数据");
        deptService.add(dept);
        return Result.success();
    }
}
返回格式:
{
  "code": 200,
  "msg": "操作成功",
  "data": [
    {"id": 1, "name": "学工部"},
    {"id": 2, "name": "教研部"}
  ]
}
请求方式和注解对照
| 操作 | 请求方式 | 注解 |
|---|---|---|
| 查询 | GET | @GetMapping |
| 新增 | POST | @PostMapping |
| 修改 | PUT | @PutMapping |
| 删除 | DELETE | @DeleteMapping |
参数注解对照
| 注解 | 适用请求 | 数据来源 | 典型场景 |
|---|---|---|---|
@RequestBody | POST / PUT | 请求体 JSON | 新增、修改,传对象 |
@RequestParam | GET / POST | url 参数、表单 | 简单查询条件 |
@PathVariable | GET / PUT / DELETE | url 路径 {变量} | 按 id 查询、删除 |
@Param | Mapper 接口 | MyBatis 参数 | mapper 多参数传递 |
补充一句 @RequestParam:接收 url 或表单里的集合参数时必须显式加它,比如 @RequestParam List<Integer> ids。JSON 请求体里的集合走 @RequestBody,不用这个。
四、分页查询与传参
不是只有 Controller 和 Mapper 的方法参数才需要注解,只是这两层最常见;Service 层大部分时候参数不加注解。
MyBatis 传入实体对象时,#{属性名} 会自动读取对象里对应的属性值(底层是调 getter)。
@Insert("insert into emp(username, name, gender, image, job, entrydate, dept_id, create_time, update_time) " +
        "VALUES(#{username}, #{name}, #{gender}, #{image}, #{job}, #{entrydate}, #{deptId}, #{createTime}, #{updateTime})")
void insert(Emp emp);#{username}→emp.getUsername()#{name}→emp.getName()#{deptId}→emp.getDeptId()#{createTime}→emp.getCreateTime()
五、文件上传与阿里云 OSS
MultipartFile
Spring 提供的接口,用来接收上传的文件。
@Slf4j
@RestController
public class UploadController {

    @PostMapping("/upload")
    public Result upload(String username, Integer age, MultipartFile image) {
        log.info("文件上传");
        return Result.success();
    }
}
形参名 image 要跟前端表单的字段名一致。
要落盘得自己写:
String originalFilename = image.getOriginalFilename();
image.transferTo(new File("D:/images/" + originalFilename));
这样写有两个问题:文件名会重复覆盖,而且服务器本地存储容量有限。所以实际用云存储。
- SDK:软件开发工具包,提供对接服务要用的依赖
- OSS:对象存储服务
- bucket:OSS 里的存储空间
解决重名用 UUID 生成新文件名。
@Value 与 @ConfigurationProperties
除了 .properties,SpringBoot 还支持 .yml 配置。
@Value 一个个注入太繁琐,用 @ConfigurationProperties 批量绑定:
aliyun:
  oss:
    endpoint: oss-cn-beijing.aliyuncs.com
    accessKeyId: LTAxxxx
    accessKeySecret: xxxxx
    bucketName: demo-bucket
import lombok.Data;
import org.springframework.boot.context.properties.ConfigurationProperties;
import org.springframework.stereotype.Component;
@Data
@Component // 交给 IOC 容器成为 Bean,才能被注入
@ConfigurationProperties(prefix = "aliyun.oss") // 原稿漏了等号
public class AliOSSProperties {
private String endpoint;
private String accessKeyId;
private String accessKeySecret;
private String bucketName;
}@Component
public class AliOSSUtils {
// 注入配置对象,里面存了 oss 四样参数
@Autowired
private AliOSSProperties aliOSSProperties;
public String upload(MultipartFile file) throws IOException {
// 1. 从 aliOSSProperties 读取配置
String endpoint = aliOSSProperties.getEndpoint();
String accessKeyId = aliOSSProperties.getAccessKeyId();
String accessKeySecret = aliOSSProperties.getAccessKeySecret();
String bucketName = aliOSSProperties.getBucketName();
// 2. 阿里云 SDK 代码,创建 OSS 客户端,上传文件
// 3. 返回文件外网访问地址
return url;
}
}SpringBoot 启动时自动读 yml,把值赋给这四个属性,相当于把配置文件封装成对象。手写读取用的是 @Value(单数,原稿写的 @Values 不存在)。
@Value 和 @ConfigurationProperties 的关系,跟注解和 XML 差不多:看配置项多少和复不复杂来选。
六、登录与会话
@Slf4j
@RestController
public class LoginController {

    @Autowired
    private EmpService empService;

    @PostMapping("/login")
    public Result login(@RequestBody Emp emp) {
        log.info("员工登录");
        Emp e = empService.login(emp);
        return e != null ? Result.success() : Result.error("用户名或密码错误");
    }
}
一开始我疑惑为什么形参不写 String username, String password,原因在前端传的是 JSON:
{
  "username": "zhangsan",
  "password": "123456"
}
SpringMVC 会把 JSON 自动映射成 Emp 对象,emp.getUsername()、emp.getPassword() 拿值。
而下面这种写法接收 JSON 是不行的:
@PostMapping("/login")
public Result login(String username, String password) {
    Emp e = empService.login(username, password);
    return Result.success();
}
JSON 请求体必须用 @RequestBody,但 @RequestBody 只能绑定一个对象,不能同时拆成多个简单参数。真想拆就用一个 DTO 或 Map<String, Object> 接着。拆开的 String 参数一般用于表单或 url 参数。
登录校验
用一个登录标记来判断是否已登录,在增删改查之前都查一次。
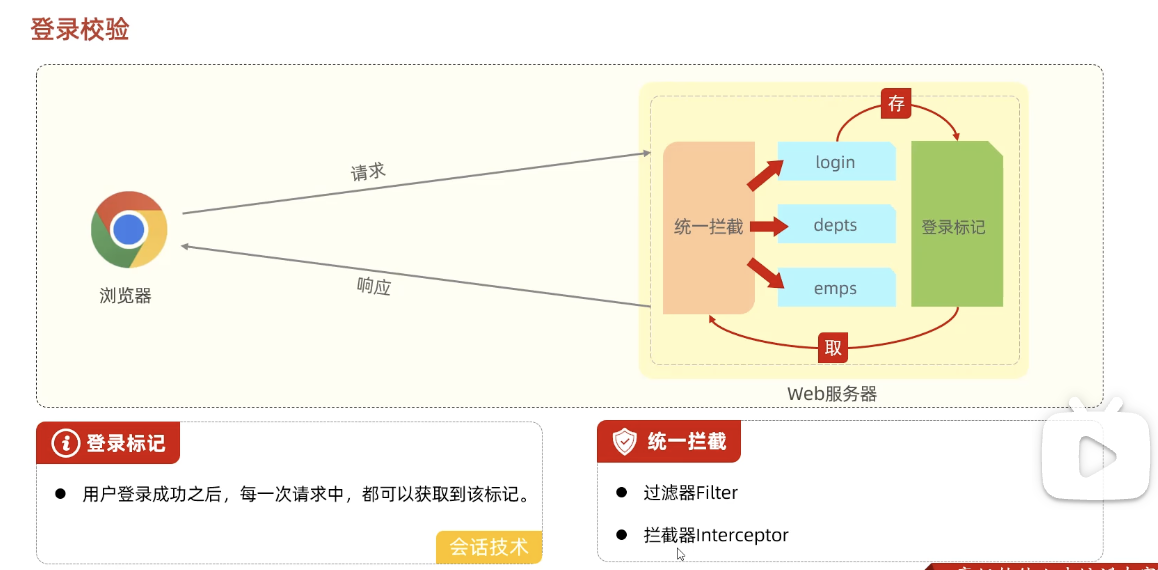
Cookie 和 Session
| 对比项 | Cookie | Session |
|---|---|---|
| 存储位置 | 浏览器(客户端) | 服务器(服务端) |
| 存储内容 | 字符串(比如 sessionId),不能存对象 | 可以存对象,比如登录的 Emp 用户信息 |
| 安全性 | 低,存在客户端,可以被篡改或窃取 | 高,数据在服务器,客户端只传一个 id |
| 容量 | 很小,4KB 上限 | 服务器内存,容量大很多 |
| 生命周期 | 可以设置过期时间 | 默认浏览器关闭会话失效,也可设置超时(30 分钟无操作销毁) |
| 依赖 | 不需要 Session | 传统模式下依赖 Cookie 传递 sessionId |
传统 Session 方案在集群环境下不好用,所以引入令牌技术。
七、JWT 令牌
JWT 把原始 JSON 数据做了安全封装。登录成功生成令牌返回前端,之后请求统一拦截、校验令牌。
@Test
public void genJwt() {
    Map<String, Object> claims = new HashMap<>();
    claims.put("id", 1);
    claims.put("username", "Tom");

    String jwt = Jwts.builder()
            .setClaims(claims)
            .signWith(SignatureAlgorithm.HS256, "itheima") // 原稿写 ES256,见下方说明
            .setExpiration(new Date(System.currentTimeMillis() + 12 * 3600 * 1000))
            .compact();
    System.out.println(jwt);
}

@Test
public void parseJwt(String token) {
    Claims claims = Jwts.parser()
            .setSigningKey("itheima")
            .parseClaimsJws(token) // 原稿漏了 token 参数
            .getBody();
    System.out.println(claims);
}
「itheima」相当于密码,claims 是要传递的数据。
原稿这里有两个错误,会导致直接抛异常:
ES256是 ECDSA 非对称签名,密钥必须是一个 EC 私钥对象。第二个参数传字符串"itheima"是跑不通的。字符串当密钥的对称算法是HS256(还有 HS384、HS512),这里应该用 HS256。parseClaimsJws()必须传入 token 字符串,即parseClaimsJws(token)。上面的写法是 jjwt 0.9.x 的 API(黑马课程用的版本)。新版 jjwt 改成了
signWith(Key),用法不一样,照着写之前先确认版本。
八、Filter 与 Interceptor
JWT 和 Filter 结合使用:
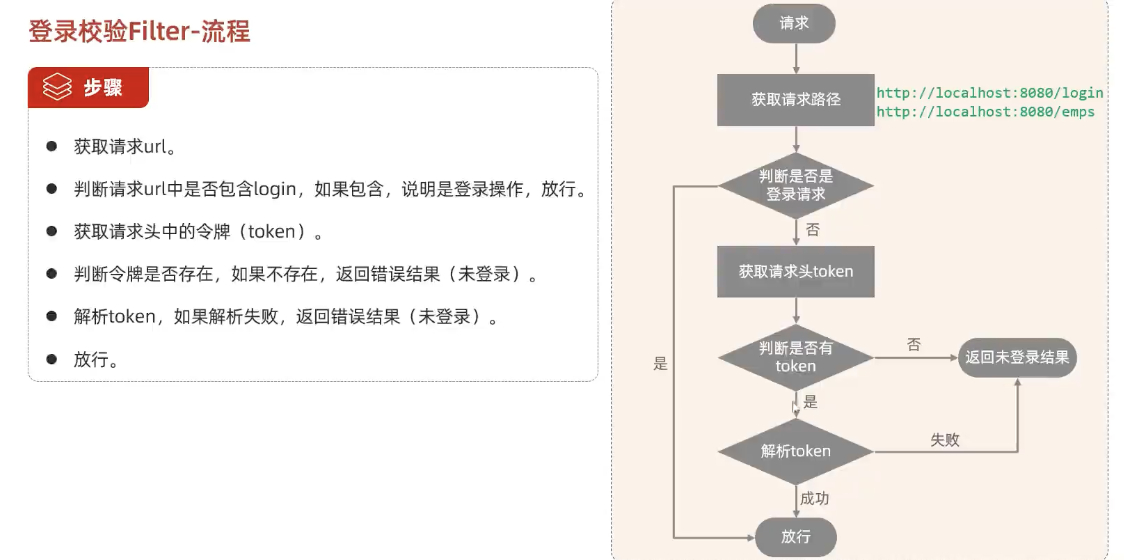
Interceptor
拦截器本身只是一个拦截规则类,SpringMVC 不知道它的存在,所以必须写一个配置类把它注册进去。
- Interceptor 类:写拦截逻辑(读 token、校验 JWT、放行或拦截)
- Config 配置类:注册拦截器,说明拦截哪些路径、放行哪些路径
@Component
public class LoginInterceptor implements HandlerInterceptor {

    // Controller 方法执行之前触发
    @Override
    public boolean preHandle(HttpServletRequest request, HttpServletResponse response, Object handler) throws Exception {
        // 1. 获取请求头 token
        String token = request.getHeader("token");

        // 2. 判断 token 是否为空
        if (token == null || token.isEmpty()) {
            response.setContentType("application/json;charset=utf-8");
            response.getWriter().write("{\"code\":1,\"msg\":\"未登录\"}");
            return false; // false 不放行,阻止进入 Controller
        }

        // 3. 解析 JWT,校验 token
        try {
            Claims claims = JwtUtils.parseJWT(token);
            return true; // true 放行,进入 Controller
        } catch (Exception e) {
            response.setContentType("application/json;charset=utf-8");
            response.getWriter().write("{\"code\":1,\"msg\":\"未登录\"}");
            return false;
        }
    }
}@Configuration
public class WebConfig implements WebMvcConfigurer {
// 注入写好的拦截器对象
@Autowired
private LoginInterceptor loginInterceptor;
@Override
public void addInterceptors(InterceptorRegistry registry) {
registry.addInterceptor(loginInterceptor)
.addPathPatterns("/**") // 拦截所有请求
.excludePathPatterns("/login"); // 放行登录接口
}
}注意 /* 和 /** 的区别:
/*只匹配一层路径,比如/depts、/login/**匹配任意层,比如/depts/1、/a/b/c
写路径匹配规则时这个区别很关键。
九、全局异常处理器
全局异常处理器会统一返回 Result 封装的错误信息。
先把两个容易混的注解分清:
@RequestBody:读请求,把请求体 JSON 转成 Java 对象(入参)@ResponseBody:写响应,把 Controller 返回的 Java 对象(比如Result)序列化成 JSON 返回前端
@RestController = @Controller + @ResponseBody。
import lombok.extern.slf4j.Slf4j;
import org.springframework.web.bind.annotation.ExceptionHandler;
import org.springframework.web.bind.annotation.RestControllerAdvice;

@Slf4j
@RestControllerAdvice // 全局 Controller 增强,捕获异常并自动转 JSON
public class GlobalExceptionHandler {

    // 捕获所有 Exception 类型异常
    @ExceptionHandler(Exception.class)
    public Result handleException(Exception e) {
        log.error("全局捕获异常:", e);
        return Result.error("服务器发生异常");
    }
}
十、事务
@Transactional 保证原子性。
默认情况下只有出现 RuntimeException(以及 Error)才回滚,受检异常不回滚。rollbackFor 用来指定哪些异常也回滚:
@Transactional(rollbackFor = Exception.class)日志类和业务 Service 默认共用同一个事务,业务抛异常会把日志一起回滚。要开独立事务用 Propagation.REQUIRES_NEW:
@Transactional
@Override
public void delete(Integer id) {
    try {
        deptMapper.deleteById(id);
        int i = 1 / 0;                      // 故意造异常
        empMapper.deleteByDeptId(id);
    } finally {
        DeptLog log = new DeptLog();
        log.setCreateTime(LocalDateTime.now());
        log.setDescription("执行了解散操作,解散的是" + id + "号部门"); // 原稿这里用了全角分号
        deptLogService.insert(log);         // 这个方法上要加 REQUIRES_NEW
    }
}
deptLogService.insert() 上加:
@Transactional(propagation = Propagation.REQUIRES_NEW)
public void insert(DeptLog log) {
    deptLogMapper.insert(log);
}
REQUIRES_NEW 会挂起当前事务、另开一个独立事务,所以业务回滚不影响日志。默认的 REQUIRED 是「有事务就加入,没有就新建」,这样日志会跟着业务一起回滚。
十一、AOP
AOP 是面向切面编程,针对一批方法做统一增强。好处是代码无侵入,不影响业务层代码,维护也方便。底层用动态代理实现。
@Component
@Aspect
public class TimeAspect {

    @Around("execution(* com.itheima.service.*.*(..))") // 原稿里点和星号之间有空格,表达式会失效
    public Object recordTime(ProceedingJoinPoint joinPoint) throws Throwable {
        long begin = System.currentTimeMillis();
        Object result = joinPoint.proceed();
        long end = System.currentTimeMillis();
        log.info("耗时:{} ms", end - begin); // 原稿 log.info(end - begin) 传的是 long,编译不过
        return result;
    }
}
切入点表达式里访问修饰符是可选的,常见的形态:
execution(返回值类型 包名.类名.方法名(参数类型))
execution(* com.itheima.service.*.*(..))          // service 包下所有类的所有方法
execution(* com.itheima.service.impl.DeptServiceImpl.delete(java.lang.Integer))
把重复的表达式抽出来:
@Pointcut("execution(* com.itheima.service.*.*(..))")
private void pt() {}

@Before("pt()")
public void before() {
    // ...
}
用自定义注解当切点
@Retention(RetentionPolicy.RUNTIME) // 必须是 RUNTIME,否则运行时 AOP 读不到
@Target(ElementType.METHOD)
public @interface Log {
}@Around("@annotation(com.itheima.anno.Log)") // 原稿 ithrima 是拼错的
public Object recordLog(ProceedingJoinPoint joinPoint) throws Throwable {
// ...
return joinPoint.proceed();
}然后哪个方法要记录日志,就在上面加 @Log。
JoinPoint 用来拿方法信息,@Around 用的是它的子接口 ProceedingJoinPoint,因为要调 proceed() 放行。
十二、SpringBoot 自动配置
starter 是起步依赖加自动配置。
starter 是什么
Starter 是一个 Maven 依赖模块,它的 pom.xml 里写好了某个场景的全套依赖。我的项目 pom.xml 只要写 starter 坐标,Maven 通过依赖传递,自动把它内部声明的 jar 全下载进来。
注意:我的项目 pom 不等于 starter 的 pom,也不是从它里面挑几个 dependency 复制过来。
引入的 jar 包里有很多类,其中一部分经过自动配置、满足条件注解后会被实例化,成为 IOC 容器里的 Bean,代码里用 @Autowired 注入使用。
自动配置流程
@SpringBootApplication 等于三个注解:
@Configuration:启动类本身是配置类@ComponentScan:扫描启动类所在包及其子包,把@Component、@Service这些类注册成 Bean@EnableAutoConfiguration:开启自动配置
@EnableAutoConfiguration 内部是 @Import(AutoConfigurationImportSelector.class),通过 ImportSelector 批量导入配置类。
它读取 META-INF/spring/org.springframework.boot.autoconfigure.AutoConfiguration.imports 里声明的候选配置类(Spring Boot 2.7 之前是 META-INF/spring.factories)。
候选配置类还要过 @Conditional 条件过滤,不是所有都生效:
@ConditionalOnClass:类路径上存在指定类才生效@ConditionalOnMissingBean:没有手动配置过这个 Bean 才生效@ConditionalOnProperty:配置项满足条件才生效
符合条件的配置类生效,Bean 注入容器。所以自动配置就是:满足条件后自动把类创建成 Bean 放进 IOC 容器,要用的时候 @Autowired 注入。
@Enable开头的注解分两类:导入配置类,或者导入ImportSelector批量导入。@EnableHeaderConfig这类自定义开关就是这个套路。
手动配置 Bean
类上没法加 @Component 的时候(比如第三方 jar 包里的类),用 @Configuration + @Bean:
// 普通类,没有 @Component,不会自动变成 Bean
public class LoginInterceptor implements HandlerInterceptor {
    @Override
    public boolean preHandle(HttpServletRequest request, HttpServletResponse response, Object handler) throws Exception {
        System.out.println("拦截请求,校验 token");
        return true;
    }
}@Configuration
public class WebConfig implements WebMvcConfigurer {
// 手动配置 Bean:方法返回的对象交给 Spring 注册
@Bean
public LoginInterceptor loginInterceptor() {
return new LoginInterceptor();
}
@Override
public void addInterceptors(InterceptorRegistry registry) {
registry.addInterceptor(loginInterceptor())
.addPathPatterns("/**")
.excludePathPatterns("/login");
}
}或者类上加 @Component,配置类里 @Autowired 注入:
@Component
public class LoginInterceptor implements HandlerInterceptor {
    @Override
    public boolean preHandle(HttpServletRequest request, HttpServletResponse response, Object handler) throws Exception {
        System.out.println("拦截请求,校验 token");
        return true;
    }
}@Configuration
public class WebConfig implements WebMvcConfigurer {
@Autowired
private LoginInterceptor loginInterceptor;
// ...
}小结:
- 手动配置:Bean 的创建逻辑由开发者自己写(
@Configuration+@Bean,或@Component) @Configuration标记配置类,这个类本身也会变成 IOC 里的 Bean(原稿写成 Bea)@Bean把方法返回的对象注册成 Bean- 自动配置:Bean 的创建逻辑写在第三方 jar 包的自动配置类里,SpringBoot 启动时解析,条件满足就自动创建
比如阿里云 OSSClient 是 jar 包里的类,源码改不了,加不了 @Component:
@Configuration
public class OssConfig {

    @Bean
    public OSSClient ossClient() {
        // OSSClient 是第三方类
        return new OSSClient("endpoint", "ak", "sk");
    }
}
自定义 Starter
待补充。